Free Amigurumi Sloth Pattern (Hanging)
A hanging amigurumi sloth with long curved arms, a cream face patch, and a slouchy oval body that curls around a branch or dowel.
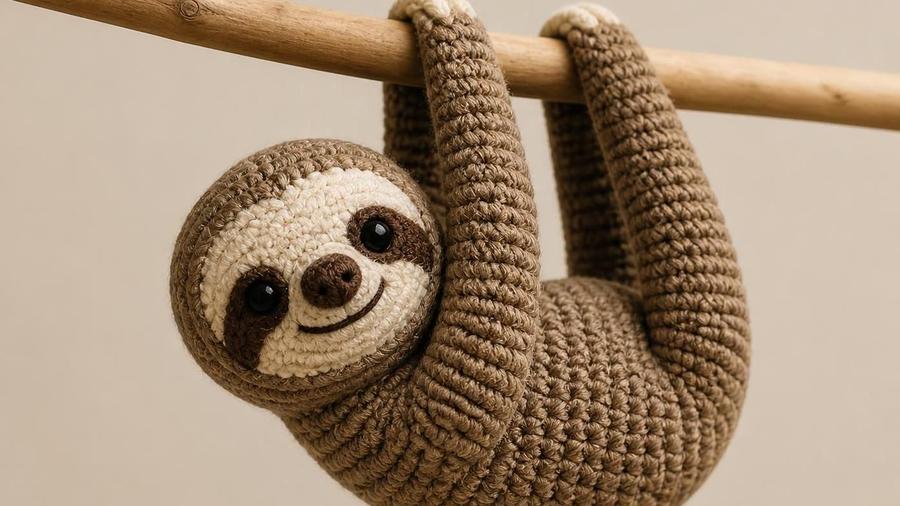
The first sloth I made looked exactly like a teddy bear that had wandered into the wrong pattern. I'd shortened the arms because the full round count seemed excessive for a small toy, and rounded the body into a plain sphere because that's what every other amigurumi animal I'd made used. Both of those "reasonable" shortcuts turned out to be exactly the two details that make a sloth read as a sloth in the first place: the genuinely elongated limbs and the slouchy, top-tapered body shape. Skip either one and you get a bear.
This pattern covers both of those load-bearing details properly, plus the color-change face patch that gives the piece its signature "eye mask" marking, and the wire-supported arms that let the finished sloth actually hang and curl around a display prop rather than just sit flat on a shelf.
Sloths have become one of the more requested amigurumi subjects in recent years precisely because that hanging pose gives them a way to be displayed that most other stuffed animals don't have. A sloth curled around a small dowel or a piece of real branch reads as a deliberate little scene rather than just another toy on a shelf, which is part of why the construction details here, longer limbs, a properly shaped body, wire support, are worth getting right rather than treating as optional flourishes.
Materials
- About 80–100 yards of brown or tan worsted-weight yarn
- Small amount of cream yarn for the face patch
- Small amount of dark brown yarn for embroidering the eye mask and smile
- 3.5mm hook
- Safety eyes, 10-12mm
- 2 short pipe-cleaner or floral-wire segments (about 4-5in each)
- Polyester fiberfill, yarn needle, scissors, stitch marker
Abbreviations (US terms)
| Abbr. | Means |
|---|---|
| sc | Single crochet |
| inc | Increase (2 sc in same st) |
| dec | Decrease (invisible dec) |
| st(s) | Stitch(es) |
See our abbreviations glossary and invisible decrease guide.
Notes
- Worked in continuous rounds throughout; place a marker at the start of each round.
- Arms and legs are worked noticeably longer and thinner than standard amigurumi limbs, this is a deliberate proportion, not an error.
- The body is shaped as an oval, wider at the base and tapered at the top, rather than a plain sphere.
Pattern
Magic ring, 6 sc into ring (6). Rnd 2: inc in every st (12). Rnd 3: *sc, inc* around (18). Rnd 4: *sc 2, inc* around (24). At round 5, begin the cream color-change patch across the center-front 10-12 sts, continuing in brown for the remaining sts. Work 3 more rounds even at 24, maintaining the two-color split each round.
Switch back to solid brown. Decrease: *sc 2, dec* around (18). *sc, dec* around (12). dec around (6). Stuff firmly. Fasten off, thread tail through remaining sts, cinch closed.
Magic ring, 6 sc (6). Inc every st (12). *sc, inc* around (18). *sc 2, inc* around (24). Work 4 rounds even at 24 (wider base). Begin gradual decreases: *sc 3, dec* (21), *sc 2, dec* (16, tapering to a narrower top where the head attaches). Stuff, fasten off, sew head to body.
Magic ring, 5 sc (5). Work even for 10-12 rounds (the full elongated length, do not shorten). Insert a wire segment before stuffing lightly. Flatten the opening and sc across to close. Attach to the body at an angle, angled forward and slightly downward, rather than straight out to the sides.
Same as arms: magic ring, 5 sc, work even for 8-10 rounds. Stuff lightly, close, and sew to the lower body, checking that both legs are the same length before committing to the final stitches.
Attach safety eyes within the cream patch area. Embroider the classic dark-brown "eye mask" curve around each eye and a small content smile below, using the face patch's own color-change boundary as your placement guide. Weave in all remaining ends once the face is finished.
The color-change face patch
The eye-mask look that sloths are known for depends entirely on a clean, deliberate boundary between the cream face patch and the brown surrounding fur, not a rough approximation. Work the color change in a smooth curve, shifting the split point gradually wider or narrower by 1-2 stitches each round rather than jumping straight to a fixed width, so the patch's edge curves naturally rather than looking like a sharp rectangular block dropped onto a round head.
Carry the unused color loosely up the inside of the work between rounds rather than cutting and rejoining each time, which saves ends to weave in and keeps the transition edge crisper. Twist the two strands once at the color-change point each round to prevent gaps from showing through on the outside.
The width of the patch matters too, not just its edge quality. A patch that's too narrow reads as a stripe rather than a face mask, while one that's too wide swallows the whole face and loses the contrast that makes the marking recognizable. Aim for the patch to cover roughly the center third of the head's circumference at its widest point, narrowing gradually as it curves up toward the crown, which mirrors how the marking actually tapers on a real sloth's face and gives the finished head a more natural, less painted-on look.
Getting the hanging pose right
The wire insert in each arm is what turns a soft, floppy limb into something that holds a deliberate curled pose. Thread it the full length of the arm before stuffing, not just partway, since an unsupported wrist end will still droop even if the upper arm holds its shape. Bend both arms into a gentle hook shape before attaching them to the body, so they're already close to their intended hanging curve rather than starting flat and needing to be bent dramatically once attached.
Attachment angle matters as much as the wire itself. Sew the arms on angled forward and slightly downward from the shoulder, roughly the angle a real sloth's arms take when reaching around a branch, rather than straight out to the sides the way a typical amigurumi animal's arms are attached. This angle is what lets the finished curl actually wrap around a prop instead of just sticking out awkwardly to either side.
Stuff the arms more lightly than you would a typical amigurumi limb, just enough to give the fabric some body without fighting against the wire's bend. An overstuffed arm resists curling and tends to spring back toward straight once you let go, which defeats the whole point of the wire insert. A loosely stuffed arm, by contrast, holds whatever curve you bend it into with very little spring-back.
Once both arms are attached and wired, do a test hang before considering the piece finished. Drape it over a pencil, a dowel, or the edge of a shelf and see whether the body settles into a natural-looking hang or tips awkwardly to one side. An uneven hang usually means one arm's wire is bent more sharply than the other's, which is an easy fix at this stage and a much harder one once the piece has been on display for a while and the yarn has taken a set in the wrong shape and lost some of its original elasticity.
Getting the sloth look right
Fix: work them for the full specified round count, don't shorten limbs to save yarn, sloth patterns genuinely need longer limbs than average amigurumi.
Fix: work the color change in a smooth curve following the stitch-by-stitch guide rather than switching abruptly mid-round.
Fix: thread a short pipe-cleaner or floral-wire segment through each arm before stuffing so it can be bent and holds its shape around a prop.
Fix: use the face patch's own color-change edges as placement guides for the eye mask rather than eyeballing it after stuffing.
Fix: follow the specified oval body shaping, wider base, tapered top, rather than substituting a plain sphere.
Our pick for authentic colors
Lion Brand Vanna's Choice, Toffee & Cream
A warm toffee-brown paired with a true cream, rather than bright white, reads as authentic sloth coloring instead of a generic teddy-bear palette, and both shades are widely available in the same yarn line for a consistent match.
View on Amazon →Amigurumi sloth FAQ
What makes this pattern actually read as a sloth instead of a bear?
Two things: the arms and legs are worked noticeably longer and thinner than a typical amigurumi limb, and the body is shaped as a slouchy oval, wider at the bottom and tapered at the top, rather than a plain sphere. Shortening the limbs or rounding the body to save time is what makes a sloth pattern collapse into looking like a generic teddy bear.
Can the arms be posed or bent after finishing?
Yes, if a short pipe-cleaner or floral-wire segment was threaded through each arm before stuffing. That wire lets the finished arms be bent and curled around a branch or dowel prop, and holds whatever position you leave them in.
What are the best yarn colors for an authentic look?
A warm brown or tan for the body with a cream or pale beige color-change patch for the face is the combination that reads as a real sloth rather than a generic teddy-bear palette. Avoid a single flat all-over color, since the two-tone face patch is what most people recognize as sloth coloring at a glance.
How do I display it hanging from a branch or dowel?
Curl the wired arms around a real branch, a purchased wooden dowel, or even a curtain rod, positioning the body so it hangs slightly below the arms the way a real sloth's weight would settle. A small dab of hot glue between the arm and the prop keeps a lightweight piece from sliding if it's being displayed rather than played with.
Safety eyes versus embroidered eyes for young children?
Safety eyes give a cleaner, more finished look and are the standard choice for a display piece. For a toy intended for a very young child, embroidered eyes are the safer option, since there's no small hard piece that could work loose over time.
Roughly how much yarn does the whole project take?
About 100-120 yards of worsted-weight yarn total, split between the brown/tan main color and a smaller amount of cream for the face patch, since the elongated limbs use more yarn than a standard-proportioned amigurumi animal of similar body size, though exact usage varies with tension and how firmly the pieces are stuffed.
CrochetGuides is a participant in the Amazon Services LLC Associates Program. As an Amazon Associate we earn from qualifying purchases, at no extra cost to you.