Free Crochet Coin Purse Pattern (Kiss-Lock Frame)
A small crochet coin purse sized to a metal kiss-lock frame, worked in structured cotton yarn.
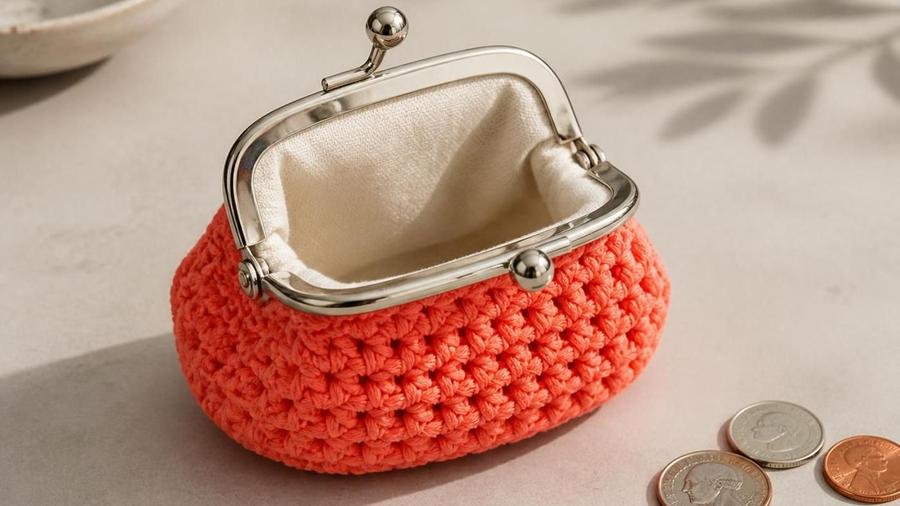
The frame, not the crochet, is what makes or breaks this project, and I learned that the hard way by crocheting a piece first and only afterward buying a frame to match. The two didn't fit. The crochet piece was slightly too wide for the frame's opening, so it bunched awkwardly at the sides no matter how I tried to ease it in while sewing. The fix for future purses was embarrassingly simple: buy the frame first, measure its actual opening width, and size the crochet piece to that specific number rather than to a generic pattern size.
This pattern covers the small rounded pouch construction, sized explicitly to match a purchased frame rather than a fixed stitch count, plus the sewing technique, regular thread, not yarn, that actually attaches a crocheted piece securely to a metal frame's small sewing holes.
A coin purse like this is a genuinely good small gift project precisely because it's fast, uses very little yarn, and the frame itself does a lot of the visual "finishing" work for you. A snap-close metal frame instantly reads as a considered, finished accessory rather than a homemade project still needing a closure figured out, which is part of why it's worth the small extra step of sourcing a frame rather than skipping straight to a simpler drawstring version.
It's also a satisfying project to make in a batch, since several small purses in different colorways use up leftover cotton scraps efficiently and make a nice set of coordinated gifts, with only the frame itself needing to be purchased fresh for each one.
Materials
- About 40–60 yards of worsted-weight cotton yarn
- 3.5-4mm hook
- A metal kiss-lock purse frame, 3.5-4in wide
- Sewing needle and regular sewing thread (matching or contrast color)
- Optional: lightweight fabric for lining, plus binder clips or safety pins for the test-fit stage
Abbreviations (US terms)
| Abbr. | Means |
|---|---|
| sc | Single crochet |
| inc | Increase |
| dec | Decrease |
| st(s) | Stitch(es) |
See our abbreviations glossary for the full list including UK terms.
Notes
- Worked from the bottom up in continuous rounds or rows, in a firm cotton yarn.
- Size the top opening to match your specific purchased frame's width exactly, not a generic stated size.
- Attached to the frame with sewing thread, never yarn, which is too thick to pass through the frame's holes.
Pattern
Magic ring, 6 sc into ring (6). Rnd 2: inc in every st (12). Rnd 3: *sc, inc* around (18). Continue increasing until the piece's width matches your frame's opening width (roughly rounds 4-5 for a standard 3.5-4in frame). Work even rounds/rows from there up to your desired purse height, typically 3-4in, checking the width against the frame periodically as you go.
On the final few rows, taper the sides slightly inward if your frame's opening is narrower than the purse's widest point, matching the frame's actual curve. For a straight-sided frame, continue even rows all the way to the top instead.
Before sewing anything permanently, clip the crochet piece to the open frame using small binder clips or safety pins, distributing them evenly around the opening. Close the frame with the piece clipped in place and check that it closes smoothly with no bunching or gaps around the edges.
Using sewing thread doubled and knotted, sew through every hole on the frame in sequence, catching a corresponding stitch of the crochet piece each time. Work from the frame's hinge on one side, around the top, to the hinge on the other side. Repeat for the second side of the frame, keeping tension even throughout.
Cut a fabric piece slightly larger than the purse's inner dimensions, fold the raw edges under, and hand-sew it in place just inside the frame's sewing line, covering the inside seam allowance and thread for a neat, finished interior.
Matching the piece to your frame
Buy the frame before starting the crochet piece, not after, and measure its actual opening width with a tape measure rather than trusting the size listed by the seller, since frame dimensions vary meaningfully between manufacturers even at the same nominal size. Work your increase rounds until the piece's width at the top matches that measured number, not a fixed round count from a generic pattern.
It's worth erring very slightly narrower than the frame's exact measurement rather than slightly wider, since a piece that's a touch too narrow can still be eased into the frame during sewing, while a piece that's too wide will bunch or need to be unpicked and reduced.
Keep your gauge swatch honest to this specific project too, since a coin purse's small scale means even a minor tension difference between your swatch and your actual working session shows up as a meaningfully different finished width. Work your gauge swatch in the same session, same mood, same yarn ball, as the actual project when possible, since tension can genuinely drift between a relaxed evening session and a rushed one, more noticeably at this small a scale than on a larger project.
Sewing onto the frame
Regular sewing thread, not yarn, is the detail that trips up nearly everyone attempting this for the first time. Standard worsted-weight yarn simply doesn't fit through the small sewing holes punched into a metal purse frame, so switching to sewing thread, doubled for strength and knotted securely, is not optional. A curved sewing needle makes navigating the tight space inside the frame's channel considerably easier than a straight needle, though a straight needle works with patience and a bit of extra care around the frame's inner curve.
Sew through every single hole on the frame, without skipping any, even where it feels redundant. Skipping holes to save time is the most common cause of visible gaps between the crochet edge and the frame once the piece is finished, since each unsewn hole is a spot where the two pieces aren't actually held together and can gradually work loose with regular use.
A whip stitch or a simple running stitch both work for this attachment, worked back through the same holes a second time for extra security if the thread feels at all loose after the first pass. Knot off securely at the hinge on each side, tucking the knot inside the frame's channel where it won't be visible or catch on anything once the purse is in regular use.
Rounded versus rectangular body shapes
A rounded pouch, worked in continuous rounds increasing outward from a magic ring, gives a softer, more casual look and hides minor gauge inconsistencies more forgivingly than a sharp-cornered shape would. A rectangular body, worked in rows with deliberate corner turns, gives a crisper, more structured look that some frame styles suit better, particularly a wider, flatter frame where a rounded body would leave awkward gaps at the corners of the frame's opening.
Either shape works with the same sizing principle: match the top width to your specific frame, and choose the overall silhouette based on the look you want rather than any structural requirement, since the frame attachment process is identical for both.
Adding a small amount of surface texture, a shell stitch border near the base, a contrasting round of a different stitch, or a small textured motif appliqued onto the front, is an easy way to make the same basic shape feel less plain without any change to the sizing or frame-fitting logic covered above. Since the sizing constraint only applies to the top opening's width, everything below that line has plenty of room for a personal touch.
A small tassel or bead charm attached to the frame's clasp, rather than the crochet body itself, is another easy customization that doesn't interact with the sizing requirements at all, since it's added after the frame is already sewn on and attaches directly to the metal hardware rather than the fabric.
Frame-fitting mistakes
Fix: measure the actual purchased frame's opening before starting and size the crochet piece to match it exactly, rather than trusting a generic pattern size.
Fix: use regular sewing thread, not yarn, to attach the piece to the frame, this trips up nearly everyone the first time.
Fix: cotton yarn holds its shape far better than acrylic for a small structured item, and a fabric lining sewn in adds even more support.
Fix: clip (don't sew) the piece to the frame first and test the close before committing to permanent stitches.
Fix: sew through every hole on the frame rather than skipping every other one, which is what leaves visible gaps.
Our pick for the frame
4in Antique Bronze Kiss-Lock Purse Frame
A standard 4in frame with a reliable snap closure and pre-punched sewing holes spaced generously enough for easy hand-sewing, a solid first choice for this pattern's scale.
View on Amazon →Coin purse FAQ
What size purse frame should I buy for this pattern?
A 3.5-4in wide kiss-lock frame is the standard size for a coin-purse-scale project like this one. Measure the frame's actual opening width before starting your crochet piece, since frame sizes vary between manufacturers even at the same stated size.
Can it be made without a metal frame using a drawstring closure instead?
Yes, work the same pouch shape and substitute a drawstring casing (a round of eyelet holes near the top) for the frame-sewing step, threading a crocheted cord or ribbon through instead. This skips the frame-fitting steps entirely and uses regular yarn for the closure rather than sewing thread, which is a genuinely simpler beginner option.
What's the best yarn for structure?
Worsted-weight cotton holds its shape far better than acrylic for a small structured item like this, since cotton has less stretch and give. A fabric lining adds even more support if extra structure is wanted for daily use.
How do I add a fabric lining?
Cut a fabric piece slightly larger than the finished crochet piece's inner dimensions, fold and hand-sew it in place along the top edge just inside the frame's sewing holes, after the crochet piece itself is already attached to the frame.
Can this realistically fit a phone or is it coins/cards only?
A standard 3.5-4in frame fits coins, a few folded bills, and 1-2 cards comfortably, but not most modern phones, which are wider than that frame opening. A larger 5-6in frame, sized up proportionally, can fit a smaller phone model comfortably.
How much yarn does the project need?
About 40-60 yards of worsted-weight cotton for a small 3.5-4in coin purse, making it a genuinely quick, scrap-friendly project that's easy to complete in a single evening.
CrochetGuides is a participant in the Amazon Services LLC Associates Program. As an Amazon Associate we earn from qualifying purchases, at no extra cost to you.