Free Crochet Witch Hat Pattern (Pointed Cone)
A classic pointed witch hat with a flat brim, tapered cone, and contrast trim band, worked in worsted-weight yarn.
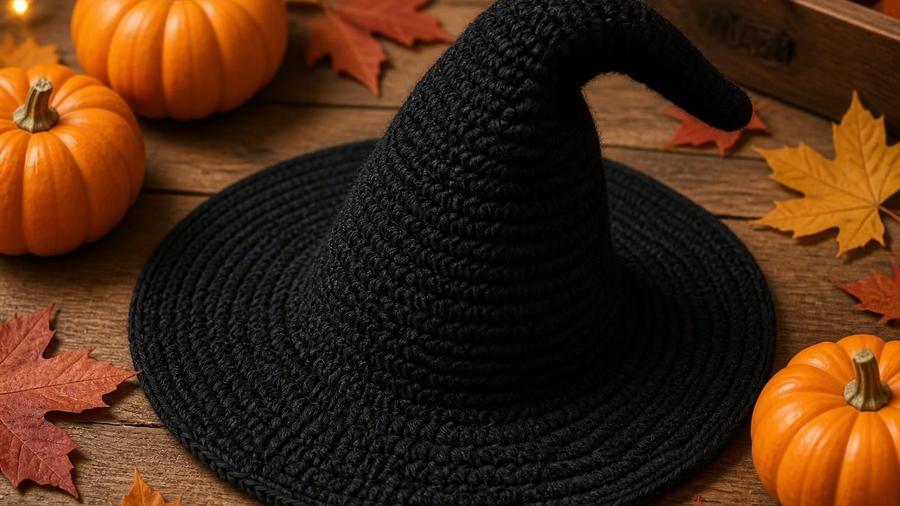
The first witch hat I made came out looking more like a lopsided ice cream cone than anything a self-respecting witch would wear. It flopped to one side, the brim curled up at the edges instead of lying flat, and the point at the top was rounded rather than sharp. It turns out a witch hat isn't just a cone shape worked by feel, it's two very specific pieces of math stacked on top of each other: a flat circle that has to actually stay flat, and a decrease taper that has to close down to an honest point rather than trailing off into a blunt curve.
Once I started following the flat-circle increase rate exactly instead of eyeballing it, and switched from a soft plush yarn to a firmer worsted-weight one, the whole hat clicked into place. This pattern covers both halves properly: the brim using the same increase math as our flat-circle technique guide, and the cone's decrease schedule tuned specifically to end in a real point rather than a rounded stub.
Materials
- About 150–200 yards of worsted-weight (US 4) yarn in black
- Small amount of contrast-color worsted yarn (orange or purple) for the trim band
- 5.0mm / H-8 hook
- Stitch marker, yarn needle, scissors
- Optional: a circle of buckram or heavy interfacing for extra brim stiffness
Abbreviations (US terms)
| Abbr. | Means |
|---|---|
| sc | Single crochet |
| inc | Increase (2 sc in same st) |
| dec | Decrease (sc2tog) |
| st(s) | Stitch(es) |
See our abbreviations glossary for the full list including UK terms.
Notes
- Worked in continuous spiral rounds throughout; place a marker at the start of each round.
- The brim uses the standard flat-circle increase rate; see our flat circle technique guide for the underlying math.
- The cone tapers with a steady decrease schedule, ending in several tight decrease rounds for a sharp point.
Pattern
Magic ring, 6 sc into ring (6). Rnd 2: inc in every st (12). Rnd 3: *sc, inc* around (18). Continue increasing by 6 sc per round, following the standard flat-circle rate, through round 7 (42 sts), or until the brim reaches your target head circumference plus 1-2in for the flared edge.
Work 2 rounds even (no increases or decreases) at the brim's final stitch count. This forms the base of the cone where it meets the brim.
Begin decreasing: *sc 5, dec* around. Work 1 round even. *sc 4, dec* around. Work 1 round even. Continue this pattern, reducing the plain-stitch count between decreases by 1 every other round, working 1 even round between each decrease round, until you have about 14 sts remaining.
Switch to decreasing every round rather than every other round: dec around until 6-8 sts remain. Work 1 more full decrease round if needed to reach 3-4 sts, then fasten off, leaving a long tail. Thread the tail through the remaining stitches and cinch tightly closed.
With the contrast color, join at the base of the cone where it meets the brim and work 1 round of sc all the way around. Fasten off and weave in ends. Sew on an optional buckle or fabric bow.
Steam the brim lightly or dampen it with a spray bottle, then pin it flat to a towel or blocking mat in its finished shape. Let it dry completely, usually a few hours, before removing the pins. This step alone fixes most minor waviness left over from tension changes while working.
Getting the brim to lie flat
The brim is the part most likely to go wrong first, and it comes down entirely to following the flat-circle increase rate rather than adding extra increases "to be safe." Single crochet needs exactly 6 new stitches every round to stay flat: fewer than that and the brim cups upward like a shallow bowl, more than that and it ruffles and waves at the edge. If your brim isn't lying flat after round 5 or 6, count your total stitches against the schedule above before continuing rather than trying to fix it later with blocking alone.
It's worth holding the work up and looking at it edge-on every couple of rounds rather than only checking it at the very end, since a brim that's starting to dome or ruffle is far easier to correct one round in than five rounds in. If you do catch a miscounted round, the fix is simple: unravel back to the last round where the stitch count matched the table, and re-work forward from there rather than trying to average out the error over the remaining rounds.
Blocking still helps even a correctly-worked brim look crisper. Once the hat is finished, dampen the brim lightly or hold a steam iron a few inches above it, then pin it flat to a towel or blocking mat and let it dry completely before removing the pins. This flattens any minor waviness left over from handling the yarn and gives the brim a cleaner, more finished edge.
Sizing for a child or adult head
Measure head circumference with a tape measure before starting, and compare that number to the brim's finished diameter at whichever round you're considering stopping the increases. For a child's head, stop the brim increases one full round earlier than the adult count above; for a larger adult head, work one additional increase round before transitioning to the cone. The cone's decrease schedule doesn't need to change either way, since it's shaping down from whatever stitch count the brim finishes at, not a fixed number.
Keep in mind that the brim's stated diameter and the actual opening the head sits in are two different measurements. The brim itself can be quite wide and dramatic without the hat feeling loose, since only the inner few rounds, right where the cone begins, need to match head circumference closely. If you want a wider, more theatrical brim without a looser fit, work extra increase rounds only after the transition-to-cone point rather than before it, then go back and add a stabilizing round of slip stitch around the very outer edge to keep that wider brim from drooping under its own weight.
For a costume that needs to survive an evening of trick-or-treating or a party rather than sit on a shelf, a snugger fit than you'd think matters more than it seems. A hat that's technically the right circumference but not gently gripping can slide backward the moment the wearer looks down, so err about half an inch smaller than a tape-measure-exact fit and let the yarn's natural stretch make up the difference.
Finishing touches that make it look store-bought
The contrast trim band does more visual work than its single round of stitches suggests, since it's the line that visually separates "cone" from "brim" and reads instantly as witch-hat rather than generic party hat. A single round in a bright contrast color, orange against black being the classic combination, gives that separation cleanly; two thin rounds in different contrast colors gives a slightly more layered, detailed look if you have scrap yarn on hand.
A small embellishment sewn onto the trim band, whether a purchased craft buckle, a folded ribbon bow, or even a scattering of small embroidered stitches suggesting stars, takes the hat from "correctly shaped cone" to "finished costume piece" in about five extra minutes of sewing. Attach anything you add with a needle and matching-color sewing thread rather than trying to crochet it directly into the band, since a separate attachment is both sturdier and easier to reposition if it doesn't land exactly where you want on the first try.
Mistakes that ruin the shape
Fix: follow the flat-circle increase rate exactly, too few increases makes it cup, and block it flat with steam or a damp cloth and pins once finished.
Fix: use a firmer worsted yarn rather than a soft chenille or plush yarn, and optionally line the inside with a circle of buckram or heavy interfacing before the final decrease rounds.
Fix: place a stitch marker at the start of every round and move it up, and recount stitches every 5 rounds.
Fix: decrease by 2 stitches every round for the last several rounds rather than easing off early, then thread the tail through the last 3-4 stitches to cinch it fully closed.
Fix: measure head circumference before starting and compare it to the brim's finished diameter, adjusting the starting increase count up or down by one full round.
Our pick for a stiff brim
Red Heart Super Saver Worsted
A firm, budget-friendly worsted-weight acrylic with enough body to hold the cone's shape without needing a stiffer interfacing liner, which makes it a solid first choice for this pattern.
View on Amazon →Witch hat FAQ
What yarn weight and hook size work best for a hat that holds its cone shape?
Worsted-weight (US 4) yarn with a 5.0mm/H-8 hook gives enough body to hold the cone upright without being too stiff to work with. A softer, drapier yarn like chenille or a plush novelty yarn will flop no matter how carefully the shaping is followed, so stick to a standard acrylic or wool-blend worsted for this one.
How do I make the point stand up straight instead of flopping over?
Use a firmer worsted yarn rather than anything soft or plush, and consider lining the inside of the cone with a circle of buckram or heavy interfacing before working the final decrease rounds. The interfacing adds structural stiffness a soft yarn alone can't provide.
Can this be resized for a child versus an adult head?
Yes, measure head circumference first and compare it to the brim's finished diameter before starting the cone. Adjust the brim's total round count up or down by one full round to widen or narrow it, then work the same cone shaping proportionally on top.
How do I add a buckle or fabric band?
Work the contrast trim band as a plain round near the base of the cone, then sew on a purchased craft buckle or a small rectangle of ribbon folded into a bow once the hat is fully finished and, if desired, blocked.
Can the hat be blocked or starched for extra stiffness?
Yes, steam blocking or a light spray starch on the brim helps it hold flat, and a stiffer interfacing liner inside the cone helps the point stay upright. Pin the brim flat while blocking and let it dry fully before removing the pins.
Roughly how much yarn and how many hours does this take a confident beginner?
About 150-200 yards of worsted-weight yarn for the main color plus a small amount of contrast for the trim band, and 3-4 hours of working time for someone comfortable with basic increase and decrease rounds.
CrochetGuides is a participant in the Amazon Services LLC Associates Program. As an Amazon Associate we earn from qualifying purchases, at no extra cost to you.