How to Seam Crochet Pieces Together: Whip Stitch & Mattress Stitch
Two seaming methods cover almost every joining job in crochet, from an amigurumi arm to a sweater side seam. Here's how to pick the right one and work it cleanly.
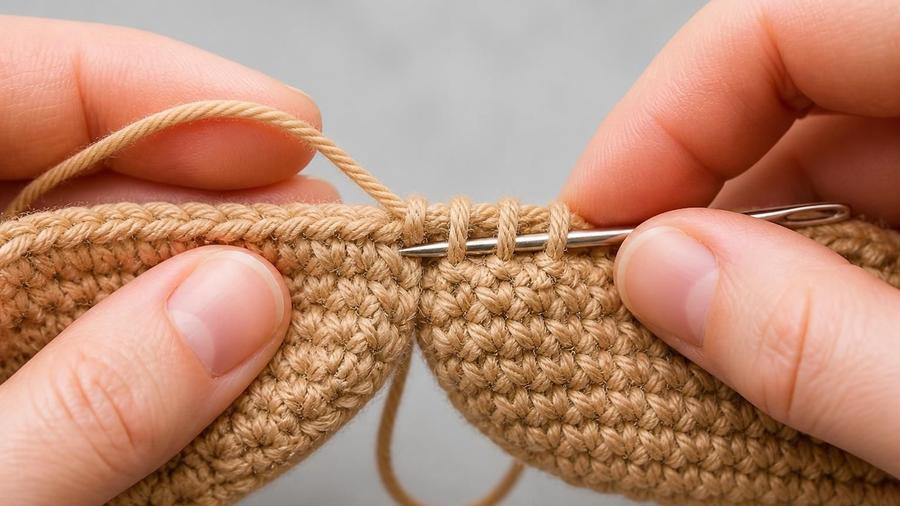
The first amigurumi elephant I ever finished had ears that pointed in two completely different directions, not because I'd crocheted them wrong, but because I'd sewn them on with big, loose, randomly spaced stitches and no real plan. It looked charming in the way a small child's drawing is charming, which is to say not the effect I was going for. Seaming, it turns out, is its own skill, separate from the crocheting itself, and it's entirely possible to crochet a beautiful set of pieces and then undermine all of it with a sloppy join.
The good news is that you really only need two methods to cover almost every seaming situation you'll encounter: whip stitch and mattress stitch. They solve different problems, whip stitch for speed and strength on curved or stuffed pieces, mattress stitch for a flat, nearly invisible seam on garment panels, and once you know which one fits which job, seaming stops being the part of a project you dread and becomes just another step.
This guide covers both methods in detail: exactly how to work each one, which situations call for which, and the small habits, consistent tension, evenly spaced stitches, matching yarn, that separate a professional-looking seam from a lumpy one.
What you'll need
Seaming doesn't require any special tools beyond what most crocheters already have on hand: a blunt-tipped yarn needle (sometimes called a tapestry or darning needle), a length of yarn, ideally matching the project, and a pair of scissors. A blunt tip matters more than it might seem, since a sharp sewing needle can split the crochet yarn's plies as it passes through stitches, weakening exactly the spot you're trying to reinforce.
Whip stitch, step by step
Steps
- Hold the two pieces together with the edges you want joined lined up, right sides facing however you want the finished seam to sit.
- Thread your yarn needle with a length of matching yarn, leaving a short tail to weave in later.
- Insert the needle through corresponding stitches on both pieces, from front to back, then bring it back around and insert again through the next matching pair of stitches.
- Continue this simple over-and-over motion along the whole seam, keeping your stitch spacing even.
- Pull the yarn snug every few stitches so the seam draws together firmly without puckering the fabric.
- At the end, work back through the last couple of stitches once more for reinforcement, then weave in both tails.
Whip stitch's strength comes from how directly it locks two edges together, stitch to stitch, in a simple spiral. It's fast to work and forgiving of slightly mismatched stitch counts, since you can adjust spacing slightly as you go, which is part of why it's the default choice for curved, stuffed amigurumi pieces where a perfectly matched row count isn't always realistic.
Mattress stitch, step by step
Steps
- Lay both pieces flat, right side up, edge to edge, rather than folded together the way whip stitch is worked.
- Thread your yarn needle with matching yarn.
- On the first piece, insert the needle under the horizontal bar between the first and second stitch of the first row, and pull through.
- On the second piece, insert the needle under the corresponding horizontal bar in the same row position, and pull through.
- Continue alternating, one bar from the first piece, then the matching bar from the second piece, working your way up the seam row by row.
- Every few rows, gently pull the working yarn to draw the seam closed; the two edges will zip together, right sides visible the whole time so you can watch the join form.
- Fasten off securely at the top and weave in both tails.
Because you're worked from the right side the entire time, mattress stitch lets you see exactly how the seam is forming as you go, which makes it much easier to catch a misalignment early. The horizontal bars it picks up sit between stitches rather than through them, so very little bulk gets added at the join, which is why the finished seam lies so flat.
Which method for which job
Whip stitch is the right call whenever you're joining curved or three-dimensional pieces, amigurumi limbs and heads, granny squares, or any spot where speed and strength matter more than an invisible finish. It's also more forgiving when the two edges don't have an exactly matching stitch count, which happens often with amigurumi shapes that were decreased or increased slightly differently.
Mattress stitch is the right call whenever the seam will be visible and needs to disappear into the fabric, most commonly garment side seams, sleeve seams, and any flat panel construction where a bulky ridge would show under clothing or catch the eye. It does require the two edges to have matching row counts, or close to it, since you're pairing up specific rows rather than adjusting spacing freely the way whip stitch allows.
Seaming amigurumi specifically
Amigurumi seaming has its own small quirks worth knowing. Pieces are usually stuffed before seaming, which changes how much give the fabric has and can make it trickier to catch matching stitches cleanly, so it helps to seam with the piece held firmly rather than loosely. Leaving a longer tail when you fasten off the piece you're attaching, rather than a separate length of new yarn, is also a common shortcut, since it saves you from having to weave in and start a fresh end just for seaming. If you're shaping the pieces themselves with decreases before seaming, our invisible decrease guide covers keeping those decrease rounds smooth so the seam has an even surface to attach to.
Seaming garment panels specifically
Garment panels are usually seamed with mattress stitch precisely because the seam sits against skin or shows under close-fitting clothing, and a bulky whip-stitched ridge is much more noticeable there than it would be tucked inside a stuffed toy. Block your panels to their finished measurements before seaming if your pattern calls for blocking; a blocked edge is easier to align accurately than an unblocked one that's still curling or uneven. Take care to seam sleeve caps and side seams with matching row-for-row alignment rather than stretching one side to fit the other, since a stretched seam will pucker once the garment relaxes after wear.
Common mistakes & fixes
Fix: this is usually whip stitch used somewhere mattress stitch would have been a better fit, or seaming yarn that's thicker than the project yarn. Switch to mattress stitch for a flatter seam, and use yarn that matches the project's weight.
Fix: your seaming tension is too tight. Loosen your pull slightly and check your progress every few stitches by laying the piece flat, rather than pulling the whole seam taut before checking how it looks.
Fix: count stitches or rows on both edges before you start seaming, and adjust your spacing as you go for whip stitch, or gently ease one side to match for mattress stitch. If the mismatch is significant, check whether the two pieces were actually meant to be the same size.
Fix: reinforce both ends of the seam by working back through the last few stitches a second time before weaving in, and make sure your fastening knot or backstitch is secure rather than just trusting a woven-in tail to hold on its own.
Fix: always seam with yarn that matches the project as closely as possible in both colour and weight, unless a contrasting seam is a deliberate design choice. A close colour match hides small tension inconsistencies far better than a mismatched one ever will.
Fix: use stitch markers at regular intervals, every ten stitches or every few rows, on both pieces before you start, so you have built-in checkpoints to confirm you're still aligned correctly.
Frequently asked questions
Which seaming method should I use for amigurumi limbs?
Whip stitch is the usual choice for attaching amigurumi limbs and heads, since it's fast, strong, and works well through stuffed, curved pieces that mattress stitch's flat-edge alignment isn't suited to. Work it through the outer loops of both pieces, pulling snugly after every few stitches.
Which seaming method gives the most invisible seam?
Mattress stitch, worked from the right side with matching yarn, gives the flattest and least visible seam of the two, which is why it's the standard choice for garment side seams and sleeve seams where a bulky ridge would show.
Should I seam with the same yarn as the project?
Generally yes, since matching yarn blends into the surrounding fabric and won't show through gaps in the stitches. A thinner, smooth yarn in the same colour family can work well for mattress stitch specifically, since it reduces bulk in the seam without being visually obvious.
Do I need a special needle for seaming crochet?
A blunt-tipped yarn needle (sometimes called a tapestry needle or darning needle) is all you need. Its rounded tip slides between stitches instead of splitting the yarn the way a sharp sewing needle would.
How do I stop a seam from stretching out over time?
Keep your seaming tension snug but not tight enough to pucker the fabric, and go back through the same stitches at the very start and end of the seam for extra reinforcement. A seam that's slightly too loose when finished will only get looser with handling and washing.
Can I use whip stitch on a garment instead of mattress stitch?
You can, and it's faster, but it leaves a slightly more visible ridge on the outside than mattress stitch does. For a garment side seam where a clean finish matters, mattress stitch is usually worth the extra time; for a hidden seam or a quick fix, whip stitch is a reasonable shortcut.
My seam looks lumpy or uneven. What went wrong?
Uneven seams almost always come from inconsistent stitch spacing or tension along the seam's length. Space your seaming stitches evenly, matching one seam stitch to roughly one crochet stitch or row, and keep your pulling tension the same from one stitch to the next rather than tightening and loosening as you go.
CrochetGuides is a participant in the Amazon Services LLC Associates Program. As an Amazon Associate we earn from qualifying purchases, at no extra cost to you.