Free Crochet Keychain Pattern for Beginners
A complete amigurumi charm in an evening — magic ring, increases, decreases, and a metal keyring that actually survives a school bag.
In my twelve years of teaching, the crochet keychain is the project I reach for when someone tells me they only have one evening to learn. It is a complete amigurumi — a magic ring, increases, decreases, stuffing, and a proper finish — but it fits in the palm of your hand and uses less yarn than a coaster. My first keychain was a slightly lopsided mustard-coloured ball I made for my niece's school bag, and she carried it until the metal ring finally wore through the yarn years later. That is the honest reality of a keychain: the hardware outlasts the stitching, so the way you attach it matters as much as the way you make it.
Materials
- Small amount of mercerized cotton or cotton-blend yarn in light worsted (DK) weight, under 25 yards
- 3.0mm (C/D) hook, smaller than standard for tight amigurumi stitches
- A pinch of polyester fiberfill stuffing
- Stitch marker, to track the start of each round
- Scissors
- Yarn needle, for closing and weaving in ends
- One purchased metal keyring with a jump ring or swivel clasp
Abbreviations (US terms)
| Abbr. | Means |
|---|---|
| sc | Single crochet |
| st(s) | Stitch(es) |
| inc | 2 sc in same stitch (increase) |
| dec | Sc 2 sts together (decrease) |
| sl st | Slip stitch |
| rnd(s) | Round(s) |
See our abbreviations glossary for the full list including UK terms.
Gauge
Gauge isn't critical for this small project — the goal is a tight, even fabric that hides the stuffing and stands up to daily wear rather than an exact measurement. If you can see stuffing through your stitches, try a smaller hook.
Notes
- Written in US terms and worked in a continuous spiral, the same technique covered in our how to crochet in the round guide.
- The keyring is a purchased metal part, not a small crocheted loop — a crocheted loop would stretch and snap, so the hardware does the heavy lifting.
- Use a smaller hook than you'd normally pair with this yarn weight — tight stitches are what keep the stuffing from showing through.
- Stuff gradually while closing the final rounds, not all at once at the end — it keeps the charm round rather than lumpy.
Pattern
Make a magic ring, 6 sc into ring, place marker. (6 sts)
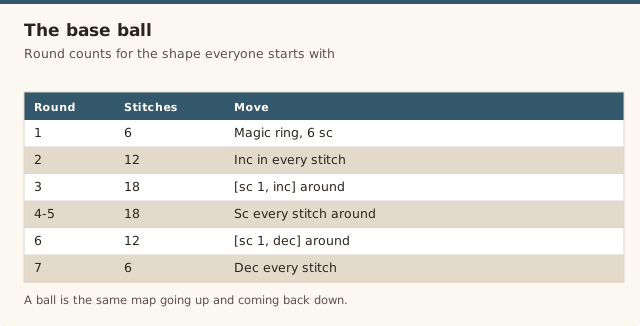
Inc in every st around. (12 sts)
[sc 1, inc] around. (18 sts)
Sc in every st around, no increases or decreases. (18 sts each round)
[sc 1, dec] around. (12 sts)
Begin adding a small amount of stuffing now, before the opening gets too small.
Dec in every st around. (6 sts)
Add a bit more stuffing if needed to fill the shape evenly.
Fasten off, leaving a long tail. Thread the tail through the front loop of each remaining stitch, pull tight to close the opening, and weave in the end through the centre of the charm.
Leave the starting tail long before you begin. Thread it onto your yarn needle, pass it through the metal jump ring, and sew it back through the centre of the charm a few times to anchor the hardware securely.
The right yarn for a tiny, durable charm
A keychain lives a harder life than almost anything else you will crochet. It gets tossed into bags, dropped onto pavement, squashed under books, and rubbed against keys all day, so the yarn you pick decides whether it looks good in a week or in a year. For a charm this small I reach for mercerized cotton or a cotton blend, because cotton holds its stitch definition beautifully at a small scale and does not pill or fuzz the way a soft acrylic does when it rubs against a bag lining. The mercerized finish gives it a slight sheen that makes a plain ball look deliberate rather than unfinished.
That said, cotton is also less forgiving than acrylic when it comes to tension. It has less stretch, which means loose stitches stay loose instead of easing themselves tight, so the small hook matters more here than on a blanket. I have watched a student use the exact same cotton on a 3.5mm hook and a 3.0mm hook and the difference in the finished charm was night and day — the tighter one looked like a proper toy, the looser one looked like a pom-pom with the stuffing showing through. If you want the deeper dive on how fibre and twist affect amigurumi, our best yarn for amigurumi guide walks through the trade-offs.
Stick to a light worsted or DK weight. Fingering weight gets genuinely fiddly on a project this small, and anything bulkier makes a charm that feels more like a stress ball than a keychain. One small point I always make in class: dark colours hide the shadows between stitches, so a charcoal or navy charm will look neater with less effort, while pale pastels will show every single increase. There is no wrong answer, just know what each colour is advertising before you commit.
Shaping variations: ball, heart, and star
The ball is where I start everyone because it is the shape that cannot hide an uneven increase. Once you can work the base through Round 3 and back down cleanly, you have the core of every amigurumi head and body, just scaled down. If you want to practise the exact same increase-then-decrease rhythm before adding any extra shaping, our mini amigurumi ball pattern breaks the same sphere down round by round, and our amigurumi for beginners guide explains why the tight spiral matters.
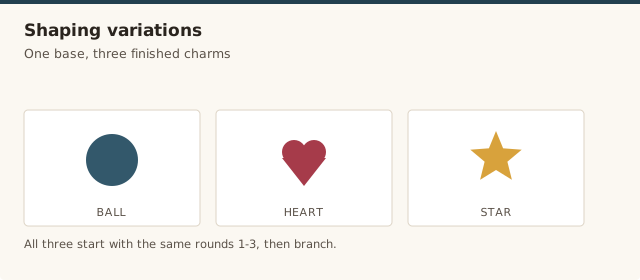
To turn the ball into a heart, start exactly the same way through Round 3. Then, instead of working straight rounds, split the next round into two halves and bunch a few extra increases into each half, one on the left and one on the right. Follow with a round or two of plain single crochet, then begin the decreases, working them toward a single point at the bottom. The two bunched increase groups become the top lobes of the heart, and a sharp decrease at the base pulls everything down into a point. Keep the lobes even by counting the stitches in each half as you go, and remember that the stuffing hides inside the lobes, so push a little into each one before you close the point.
A star is fussier, because five points all have to match. A simple method is to work five [sc 3, inc] repeats to set the points evenly around the circle, then decrease back down in the matching positions so each point comes to its own tip. I tell students to place a separate stitch marker at the start of each point, because five nearly identical sections are exactly where your counting goes wrong in a hurry. Stars read best in a single bold colour; the five-fold symmetry already does the talking, and extra colour changes just add seams to keep track of. If you have not worked one before, do the heart first and graduate to the star once the lobes come out even.
Attaching the keyring hardware
Here is the part most beginner patterns gloss over, and it is the part that decides whether your charm stays attached to a bag or vanishes into a lost-and-found box. The keyring is a purchased metal part, not a small crocheted detachable loop, and this is deliberate. A crocheted loop made from the same yarn as the charm will stretch the moment any weight pulls on it, and once a loop stretches it keeps stretching until it snaps. A metal jump ring or swivel clasp holds its shape forever and lets the charm spin freely instead of twisting the yarn.
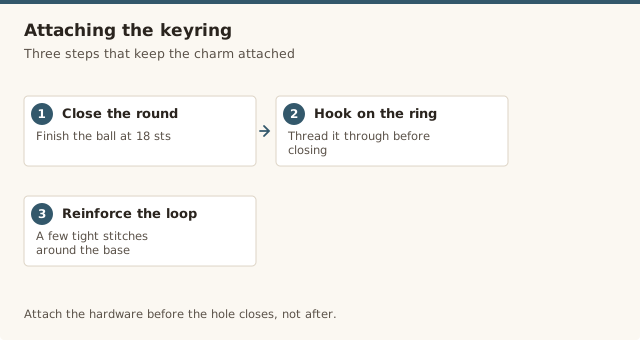
The cleanest way to attach it is to plan ahead at the very start. Leave a generous starting tail when you make the magic ring, at least 6 to 8 inches, and do not weave it in as you go. Once the charm is closed, thread that long starting tail onto your yarn needle, pass it through the metal jump ring, and sew the tail back through the centre of the charm a couple of times so the hardware is anchored inside the stuffing, not just stitched to the surface. A surface stitch is exactly what rips out after a few weeks; an anchor through the middle spreads the strain across the whole charm.
If you forgot to leave the starting tail long, do not panic and do not hang the keyring from the closing tail alone. Cut a fresh length of yarn in the same colour, thread it onto the needle, pass it through the jump ring, and bury it through the centre of the charm in a few directions, coming out the far side each time. Pull it firm but not tight enough to pucker the fabric, then weave the end away inside the stuffing. For anything that will be handled roughly, a swivel clasp is worth the few extra pence, because it lets the charm spin when the keys turn rather than twisting the yarn into a tight rope.
Gifting and finishing touches
Keychains are the gift I recommend when you want to make something for a whole class, a team, or a family reunion without bankrupting your yarn stash. A single ball of cotton will make a dozen charms, so a set becomes affordable in a way a dozen scarves never will. I have made a colour-coded set for a gymnastics group one Christmas, each girl getting a charm in her own colour on the same simple keyring, and the whole project cost less than the wrapping paper. If you are batch-making, chain the work: make all the magic rings first, then all the Round 2s, and so on, so you keep the tension consistent from one charm to the next.
Small embroidery turns a plain ball into something personal without much effort. Two French knots for eyes and a short straight-stitch smile read as a face from across a room, and initials work just as well. Do the embroidery before you close the charm, while you can still reach the inside to bury the yarn tails, otherwise you are stitching blind through a closed sphere and every knot shows on the outside. If you are gifting a charm, slip it onto a small card with the recipient's name, and it instantly stops being a handmade trinket and starts being a keepsake.
One more practical note for gifting: warn the recipient that the charm is cotton and will not love being machine washed. A quick wipe or a gentle hand wash in cool water is plenty, and pressing it back into shape while it dries keeps it round. I learned this the hard way when my niece put her keychain through the wash and it came out resembling a sad, damp bean. It dried, we reshaped it, and she still has it, but the warning would have saved us both a moment of mild panic.
Common mistakes & fixes
Fix: your hook is too big for this yarn. Drop a size or two so the stitches close up into a dense fabric, and review the stitch tension in our basic crochet stitches guide before you restart.
Fix: your increases and decreases are uneven. Count your stitches at the end of every round and keep the increase and decrease halves symmetrical, the same rhythm covered in our amigurumi ball pattern.
Fix: pull the magic ring tail tightly before you weave it in, and if the centre loosens later, thread the tail back through the front loops around the hole and pull again. Our magic ring tutorial shows how to cinch it shut without snapping the yarn.
Fix: you hung the charm from a surface stitch instead of anchoring the hardware. Thread the starting tail through the jump ring and sew it back through the centre of the charm several times so the strain is spread, not held by one or two stitches.
Fix: stuffing is a matter of small pinches, not one big lump. Add a little at a time as you close the final rounds and stop the moment the shape feels firm but still springy, then pinch it into round as you finish.
Fix: attach the jump ring at the top centre of the charm, where the magic ring began, and use a swivel clasp so the charm can spin when the keys turn rather than twisting the yarn into a rope.
Our pick
Stainless Steel Keyring and Jump Ring Set
Enough split rings and jump rings to finish a whole batch of charms, in steel that won't bend, tarnish, or pinch the yarn as the charm swings.
View on Amazon →Frequently asked questions
What size should a crochet keychain charm be?
Aim for about 1.5 to 2 inches (4 to 5 cm) across. This keeps the charm light enough that it won't drag on a zipper pull or keys, while still being big enough to shape cleanly. If you want a larger charm, add one more increase round before the straight rounds and one more decrease round at the end.
What kind of keyring should I use for a crochet keychain?
Use a purchased metal keyring with a jump ring or swivel clasp. The hardware is a bought metal part, not a crocheted loop, because a crocheted loop stretches and snaps with daily use. Metal holds its shape and lets the charm swivel and lie flat on a bag.
Which yarn is best for a keychain that gets tossed in a bag?
Mercerized cotton or a cotton blend is the most durable choice, because cotton doesn't pill or fuzz the way soft acrylic does when it rubs against keys and bag linings. Work it on a small hook for a tight fabric. A light worsted or DK weight keeps the charm small without becoming fiddly.
How do I stop the stuffing from showing through a tiny charm?
Work on a hook one to two sizes smaller than the yarn label suggests so the stitches close up into a dense fabric. Stuff in very small pinches rather than one lump, and stop as soon as the shape feels firm but not hard. A tighter fabric hides the stuffing entirely.
Can I make a heart or star instead of a ball?
Yes, the same base works for both. For a heart, split the top of the ball into two bumps with extra increases in two sections of one round. For a star, work five small points around the centre using short runs of increases then decreases. The ball is the easiest place to start before trying those.
How do I attach the keyring so it doesn't pull off?
Leave the starting tail long, thread it onto your yarn needle, pass it through the metal jump ring, and sew it back through the centre of the charm a few times. Weave the end in through the middle of the ball so it's anchored inside the stuffing, not just on the surface.
Can I add a face or embroidery to my keychain charm?
Yes, embroider eyes, a smile, or initials with a small length of contrasting yarn before you close the ball, while you can still reach the inside. For a very small charm, two simple French knots or a short straight-stitch smile read best without cluttering the surface.
CrochetGuides is a participant in the Amazon Services LLC Associates Program. As an Amazon Associate we earn from qualifying purchases, at no extra cost to you.