How to Add a Border or Edging to Any Crochet Project
Three edgings, simple single crochet, picot, and shell, cover almost every finishing job a crochet project needs.
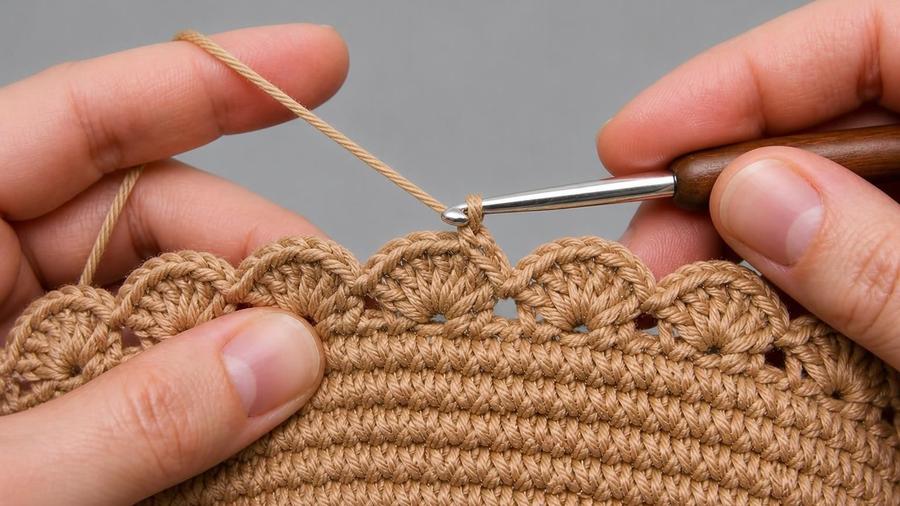
For a long time, I finished every single project the exact same way: one round of single crochet, fasten off, done. It wasn't that I didn't know other edgings existed, I'd just never taken the ten minutes to actually learn one, so I defaulted to the one I already knew every single time, even on projects that would have looked considerably better with something a little more decorative. It took a granny square blanket that felt strangely unfinished, despite being technically complete, for me to finally sit down and learn a shell edging.
The difference a good, well-chosen border makes is genuinely disproportionate to the small amount of effort involved. A plain rectangle of single crochet reads as "a swatch." The exact same rectangle finished with a neat scalloped shell edging reads as "a finished piece." Borders do real structural work too, tidying a raw or slightly uneven edge, stabilizing a piece that's prone to curling, and giving corners a clean, deliberate finish instead of a slightly awkward, unfinished-looking pivot. They're one of the highest-value-for-effort skills in the whole craft.
This guide covers three edgings that between them handle almost any finishing job: simple single crochet edging for a clean, low-effort finish; picot edging for a touch of delicate detail; and shell edging for a fuller, scalloped, more decorative border. All three can be worked on almost any finished piece, from a granny square to a blanket to a garment opening.
None of the three require any special materials or a different hook than the rest of your project, and none take more than a few minutes to learn well enough to use confidently. What they do require is a bit of stitch-count awareness, since a patterned edging worked over the wrong multiple will refuse to come out even, a small planning step that's easy to build into your workflow once you know to look for it.
Before you start
Most edgings work directly with your project's existing yarn and hook, though a slightly smaller hook can help tighten up a loose or curling edge. If your piece is meant to be blocked, block it to its finished measurements before adding the border, since edgings behave more predictably on an edge that's already the right size and shape rather than one that's still curling or unevenly stretched. If you're not sure whether your project needs blocking at all, our guide to blocking covers when it's worth the extra step.
Work out how many edging stitches you need
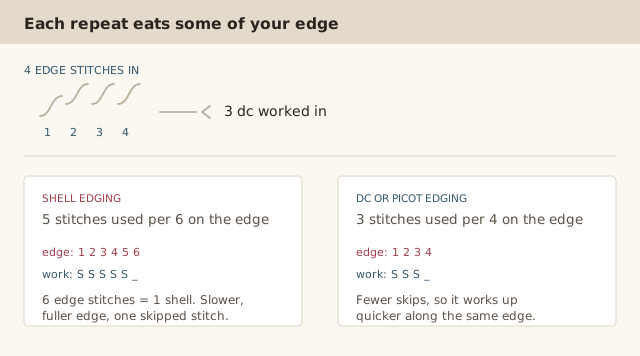
This is the step that stops a border, and it is where most first attempts go wrong. An edging is not worked one stitch per edge stitch. Each repeat of the edging pattern eats a different number of them, so you have to divide your edge count by that number before you can start.
The arithmetic is straightforward once you know the ratio. Work out how many stitches are on the edge of your finished piece, divide by the number each repeat consumes, and round down if the result is not a whole number.
| Edging repeat | Edge stitches used | On an edge of 240 | Note |
|---|---|---|---|
| Single crochet (sc) | 1 per stitch | 240 | The easy one. Matches your edge count exactly. |
| Half treble (htr) | 1 per stitch | 240 | Same count as sc. Sets up taller edgings. |
| Double crochet (dc) | 3 per 4 stitches | 180 | Divide by 4, multiply by 3. |
| Treble (tr) | 4 per 5 stitches | 192 | Divide by 5, multiply by 4. |
| Picot | 3 per 4 stitches | 180 | Two chains plus a stitch in the third. |
| Shell | 5 per 6 stitches | 200 | Five dc worked into one stitch. Grows fast. |
To count the stitches on your edge, lay the piece flat and count the V shapes along the bottom edge of the last row. Counting the tops instead is where people lose track, and our guide to counting crochet stitches shows the method that stays reliable in fuzzy yarn.
Check your answer twice before joining the ends. Joining an edging with a mismatch is what causes the ripple you can see along a finished edge, and it is much easier to fix at the maths stage than after several rows of edging. Our guide to fixing curling edges covers what to do if you have already joined and the edge has started to ruffle.
Choosing an edging at a glance
The short version of the guidance below, so you can pick before you commit to a stitch pattern.
| Edging | Best for | Reads as | Effort |
|---|---|---|---|
| Single crochet | Speed, clean edges, edges that don't divide neatly into a repeat | Understated and neat | Lowest |
| Picot | A light decorative touch, delicate and baby items | Small points of texture | Low |
| Shell | Blankets and garment hems where the edge should be a feature | Full and scalloped | Medium |
Simple single crochet edging
Steps
- Join your yarn with a slip knot at any corner or along a seam if your project has one.
- Single crochet into each stitch across a straight edge, or into each row-end along a side edge, working evenly so the border doesn't pull the fabric tight or leave it loose.
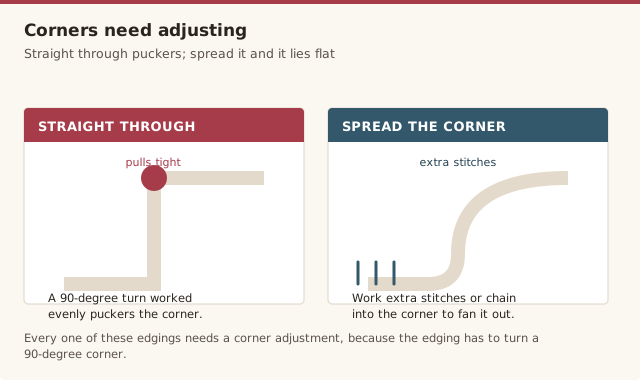
- At each corner, work 3 single crochet into the same corner stitch to give the border enough fabric to turn the 90-degree angle without puckering.
- Continue around the entire piece, then join with a slip stitch to your very first stitch.
- Fasten off and weave in both ends.
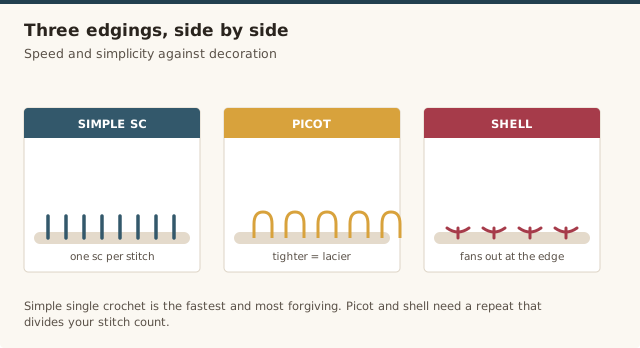
This is the fastest, most foolproof edging, and it's an excellent default whenever you want a clean, tidy finish without any decorative flourish, or when you're not sure your project's stitch count works out to a nice multiple for a patterned edging. It's also the most forgiving option if your edge is a little uneven, since you're just matching one stitch to one stitch rather than tracking a repeat.
Picot edging
Steps
- Work a plain foundation round of single crochet first (see the simple edging steps above), which gives picot edging a stable, evenly spaced base to build from.
- Single crochet into the next stitch.
- Chain 3, then slip stitch into the first of those 3 chains, creating a small loop, the picot.
- Single crochet into the same stitch you started this repeat in.
- Skip the next 1-2 stitches (or work sc into each, depending on how densely you want the picots spaced), then repeat from the single crochet step.
- Continue around, join, fasten off, and weave in ends.
Picot edging adds a delicate, slightly bumpy texture along the edge without much bulk, which makes it a popular choice for baby items, doilies, and anywhere a subtle decorative detail fits better than something bold. Spacing the picots more tightly gives a denser, lacier look; spacing them further apart gives a more restrained accent.
Shell edging
Steps
- Work a plain foundation round of single crochet first, over a stitch count that divides evenly into groups of 3, adjusting your foundation round's stitch count slightly if needed to reach a clean multiple.
- Skip the first 2 stitches of the foundation round.
- Work 5 double crochet into the next stitch, creating a fanned "shell" shape.
- Skip the next 2 stitches, then slip stitch into the following stitch to anchor the shell and create the small dip between shells.
- Repeat from the skip-2 step around the entire edge.
- Join, fasten off, and weave in ends.
Shell edging gives a fuller, more visually prominent scalloped border, popular on blankets, the hems of garments, and anywhere you want the edge itself to read as a design feature rather than just a finishing touch. Because it repeats over groups of 3 stitches, getting your foundation round's stitch count to a clean multiple of 3 (adjusting by a stitch or two if needed) makes the repeat come out even all the way around.
Handling corners cleanly
Every one of these edgings needs a small adjustment at corners, since a flat edging worked straight through a 90-degree turn will pull tight and pucker without some extra fabric added there. For simple single crochet edging, working 3 stitches into the actual corner stitch is the standard fix. For picot or shell edging, the exact corner treatment can vary depending on where a repeat happens to land, and it sometimes takes a little improvising, working an extra shell or an extra picot right at the corner point, to keep the pattern looking continuous rather than abruptly cut off. When in doubt, err on the side of a little extra fabric at the corner rather than too little; a slightly generous corner lies flatter than a stingy one.
Choosing the right edging for your project
Reach for simple single crochet edging when speed and a clean, understated finish matter most, or when your project's stitch count doesn't divide neatly into a repeat. Reach for picot when you want a light decorative touch that won't compete with the main design, especially on delicate or baby items. Reach for shell when you want the border itself to be a visible, textured feature, especially on blankets and garment hems where a fuller scalloped edge reads as intentional and finished rather than plain.
Common mistakes & fixes
Fix: too many stitches have been worked into the edge relative to its length. Reduce your stitch count slightly, and check you haven't accidentally added extra stitches beyond what corners actually need.
Fix: the opposite problem, too few stitches for the edge's length. Add slightly more stitches along the edge and confirm you're working the recommended increase at every corner.
Fix: check your foundation round's stitch count against the repeat's multiple (3 for shell, typically 3-4 for picot) before starting the patterned round, and adjust the foundation round by a stitch or two if it doesn't divide cleanly.
Fix: add a little extra fabric right at the corner, an extra stitch, shell, or picot as needed, rather than forcing the existing repeat to squeeze through the turn unchanged.
Fix: take a moment to match your tension to the main piece before starting the border, especially if some time has passed since you finished the body of the project and your hands have settled into a different rhythm.
Frequently asked questions
Which edging is easiest for a beginner?
Simple single crochet edging is the easiest starting point, since it's just one round of single crochet worked evenly around the piece, with no repeat pattern or stitch count math to track.
Do I need a specific stitch count for my project's edge before I add a border?
Only for patterned edgings like shell or picot, which repeat over a set number of stitches (commonly a multiple of 3 for shell edging or a multiple of 3-4 for picot). A plain single crochet edging doesn't need a specific multiple, since it's worked one-to-one into whatever's there.
My border is rippling or ruffling. What's wrong?
Too many stitches worked into the edge relative to its actual length, often from working extra stitches at corners without accounting for it, or simply working every round's edge too generously. Reduce your stitch count slightly and check that corners get only the recommended increase, not extra beyond that.
My border is pulling my project in and making it cup or curl.
This is the opposite problem, too few stitches for the edge's length, pulling it in tighter than the rest of the piece. Add slightly more stitches along the edge, and make sure you're adding the recommended extra stitches at each corner to let the border turn the corner rather than pulling it inward.
Can I add a border in a different colour than the main project?
Yes, a contrast-colour border is a common and easy way to add visual interest to a finished piece. Join the new colour at a corner or seam for the cleanest transition, and weave in the join ends securely.
How do I handle corners when adding a border?
Work extra stitches into the actual corner stitch, commonly 3 stitches into 1 for a single crochet edging, so the border has enough fabric to turn the 90-degree corner without pulling or puckering. Patterned edgings like shell or picot may need their own specific corner adjustment, described in that pattern.
Should I block my project before or after adding a border?
Generally, block the main piece to its finished measurements first, then add the border, since the border benefits from being worked onto an edge that's already the right size and shape. A light re-block after the border is added can help even out the finished edge if needed.
CrochetGuides is a participant in the Amazon Services LLC Associates Program. As an Amazon Associate we earn from qualifying purchases, at no extra cost to you.