Free Crochet Pumpkin Pattern for Beginners
A ribbed amigurumi pumpkin using back-loop stitches for texture, with a simple stem on top.
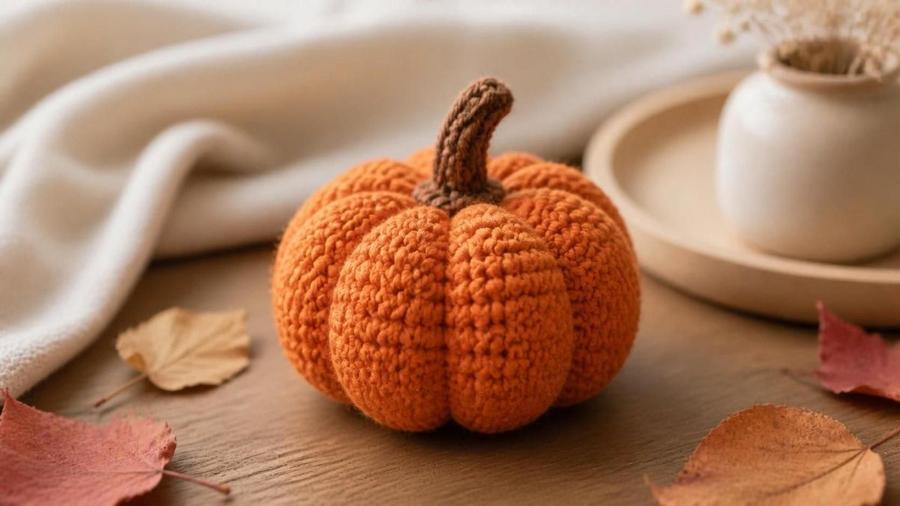
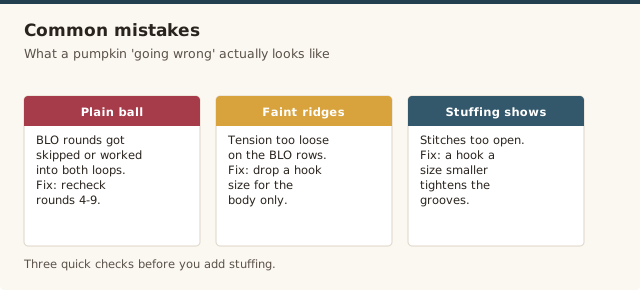
Every autumn I teach this crochet pumpkin pattern in my classes, and it's the project that finally makes the magic ring click for people, because you can see the ribbed texture appear round by round. The mistake I see most often is working the back-loop-only rounds with loose tension, so the ridges come out faint and the pumpkin looks like a plain orange ball. I always tell my students to drop down a hook size if the ribs look soft. I remember one woman who arrived with a bag of leftover orange yarn from years of other projects and left with three pumpkins and a brand-new confidence in her shaping. It uses almost no yarn and takes about an hour.
The back loop is the whole trick. By working into only the back loop of each stitch, you leave the front loop free, and those little stranded loops build into the vertical grooves that make a pumpkin read as a pumpkin instead of a beach ball. It's a small move that does an enormous amount of work, and it's the reason I keep coming back to this pattern every October when I need a table full of matching squash in an afternoon.
Materials
- Small amount of orange worsted-weight yarn (about 30–40 yards)
- Small amount of green or brown yarn, for the stem
- 4.0mm hook
- Polyester fiberfill stuffing
- Stitch marker, scissors, and a yarn needle
Abbreviations (US terms)
| Abbr. | Means |
|---|---|
| sc | Single crochet |
| st(s) | Stitch(es) |
| inc | 2 sc in same stitch (increase) |
| dec | Sc 2 sts together (decrease) |
| BLO | Back loop only |
| rnd(s) | Round(s) |
See our abbreviations glossary for the full list including UK terms.
Gauge
Gauge isn't critical for this small project — the goal is tight, even stitches that hide the stuffing rather than an exact measurement.
Notes
- Written in US terms, worked in a continuous spiral, same shaping as our mini amigurumi ball pattern.
- Working through the back loop only (BLO) on the body rounds is what creates the ribbed pumpkin texture.
- A short crochet chain or a chenille stem substitute both work for the stem — see the FAQ below.
Pattern
Using orange yarn, make a magic ring, 6 sc into ring, place marker. (6 sts)
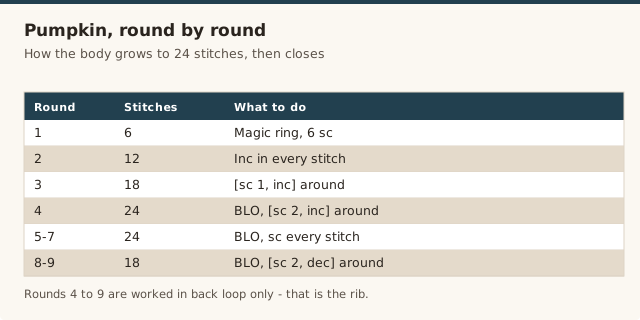
Inc in every st around. (12 sts)
[sc 1, inc] around. (18 sts)
Working in BLO throughout this round, [sc 2, inc] around. (24 sts)
Working in BLO throughout, sc in every st around, no increases. (24 sts each round)
Working in BLO throughout, [sc 2, dec] around. (18 sts)
Begin stuffing firmly.
Working in BLO throughout, [sc 1, dec] around. (12 sts)
Add final stuffing to fill evenly.
Switch to green or brown yarn. Chain 8, then sc in the 2nd chain from hook and in each remaining chain. Fasten off, leaving a short tail for sewing.
Close the body opening by threading the orange tail through the front loops of the last round and pulling tight. Sew the stem securely into the centre of the top opening. Weave in all ends.
A beginner amigurumi tutorial for a crochet pumpkin, useful for seeing the ribbed shaping and stuffing technique.
Yarn & colour choice
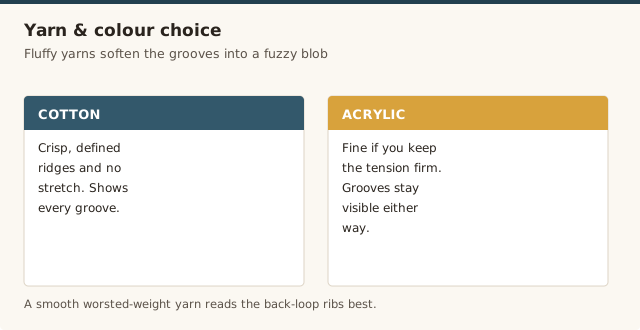
A smooth worsted-weight yarn shows the back-loop ribs best, so I steer people away from fluffy or heavily variegated yarns for this one. A tweedy or marled orange can look lovely, but anything with a long halo softens the grooves until the pumpkin reads as a fuzzy blob. Cotton gives you crisp, defined ridges and no stretch, while acrylic is fine if you keep the tension firm — the difference shows most in how sharply the vertical lines stand out. If you're unsure how a given ball will behave, check our yarn weight guide and swatch a couple of BLO rounds before committing to the whole body.
For colour, I don't stick to pure orange. A burnt orange, a muted rust, even a mustard or cream pumpkin all read as autumn when the ribbing is there. Make a set in three different oranges and they'll look like a farm stand rather than three copies of the same squash. A scrap of brown or green for the stem is all you need to finish the illusion.
Making pumpkins bigger or smaller
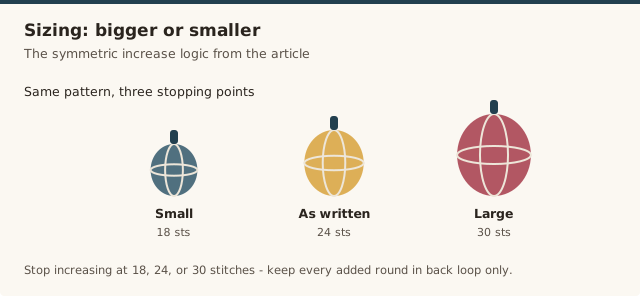
The body grows and shrinks by the same symmetrical logic as our amigurumi ball. To make a larger pumpkin, add one more increase round before the straight BLO rounds (so you hit 30 stitches instead of 24), work one extra even round, then mirror the same number of decrease rounds at the bottom. Keep every added round in back loop only so the ribs continue cleanly. For a smaller pumpkin, stop increasing at 18 stitches and adjust the even and decrease rounds to match. The stem can stay the same size either way — a slightly chunky stem on a small pumpkin looks intentional rather than wrong.
Autumn decor & gifting
This is the project I suggest when someone wants to hand-make their seasonal decorating instead of buying it. A bowl of three or five pumpkins in different sizes and shades takes an evening and outlasts any real gourd by months. Because they're stuffed and squishy, they sit nicely on a mantel or in a centrepiece without rolling. They also travel well as a host gift — I've tucked one into a dish of wrapped chocolates more than once and it's always the first thing people comment on. If you're making several as gifts, work them in the recipient's own kitchen colours rather than your own, and it instantly feels personal.
Fairfield Poly-Fil Premium Fiber Fill, 32oz
Enough for many small seasonal projects like this one, staying fluffy without clumping over time.
View on Amazon →Common mistakes & fixes
Frequently asked questions
How do I get the ribbed pumpkin shape in crochet?
The ribbed look comes from working back loop only stitches through most of the body rounds, which creates visible horizontal ridges similar to a real pumpkin's grooves.
What can I use for a pumpkin stem if I don't want to crochet one?
A short length of brown or green chenille stem (pipe cleaner), bent and trimmed to size, works as a quick substitute and can simply be pushed into the top opening before closing.
How many pumpkins does one skein of yarn make?
A single skein of worsted-weight yarn typically makes 2 to 3 pumpkins at this size, depending on the total yardage of the skein.
How do I make my crochet pumpkin bigger?
Add one more increase round to the body and work the matching extra rounds and decreases symmetrically, keeping the back-loop-only stitch throughout. You'll also want a little more yarn and stuffing for the larger size.
Can I use fluffy or textured yarn for a crochet pumpkin?
You can, but the ribbed back-loop texture tends to disappear in fuzzy yarns, and the ridges are what make it read as a pumpkin. A smooth worsted-weight yarn shows the shaping most clearly.
How long does this crochet pumpkin take to make?
Around an hour once you know the shaping, and much of that is the stuffing. It's short enough to make a matching set of three in a single evening.
How do I wash a crochet pumpkin?
Spot-clean or hand-wash gently in cool water and reshape while it dries. Don't machine-wash stuffed pieces, since the stuffing can clump and the ribs can lose their definition.
CrochetGuides is a participant in the Amazon Services LLC Associates Program. As an Amazon Associate we earn from qualifying purchases, at no extra cost to you.