Free Crochet Turkey Pattern for Beginners
A round amigurumi turkey with a colourful fan of tail feathers, a small head, and a dangling wattle, made for Thanksgiving tables.
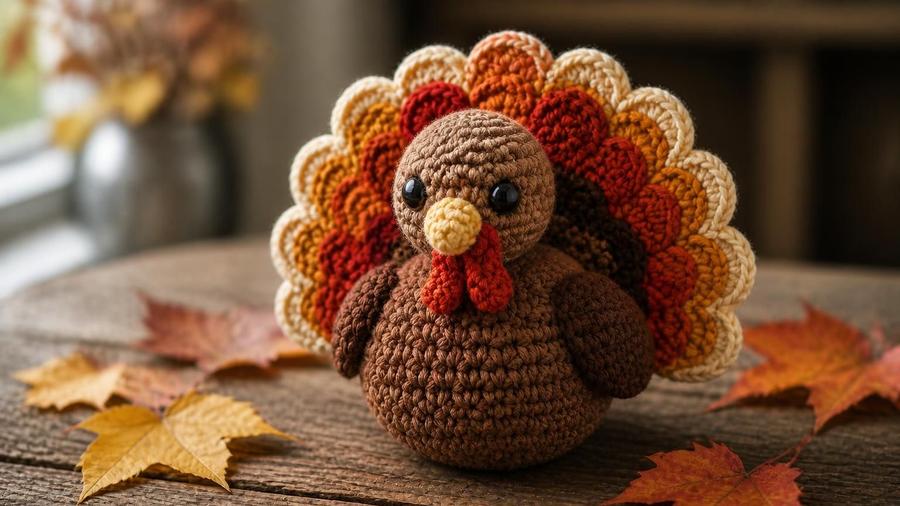
Every November I teach this crochet turkey in my classes, and it is the one project where people stop mid-round just to hold the fan of feathers up against the body and grin, because suddenly the plain brown ball they have been staring at looks like a real Thanksgiving bird. The mistake I see most often is rushing the tail fan, working it loosely so it flops over instead of standing up behind the body. I always tell my students to keep the fan rows a touch firmer than the body and to sew it on in two or three passes. I remember one woman who came in the week before Thanksgiving convinced she would not finish, and she left with the turkey perched on her palm and a plan to make three more as place settings.
The fan is the whole trick. Everything else is plain single crochet worked in a spiral, which is why I genuinely believe a beginner can make this. The body grows and shrinks in the same neat rhythm as a simple ball, the head is just a smaller version of the same thing, and the beak and wattle are a chain of stitches long. The only part that looks fancy is the tail, and that is really just a flat half-circle edged in a row of little loops in autumn colours. Learn that one move and the rest of the turkey makes itself.
Materials
- Brown worsted-weight yarn, for the body and head (about 40–50 yards)
- Small amounts of autumn colours for the feathers: rust, mustard, gold, and deep red (a few yards each)
- Small amount of orange yarn, for the beak
- Small amount of red yarn, for the wattle
- 4.0mm hook
- Polyester fiberfill stuffing
- Stitch marker, scissors, and a yarn needle
Abbreviations (US terms)
| Abbr. | Means |
|---|---|
| sc | Single crochet |
| st(s) | Stitch(es) |
| ch | Chain |
| sl st | Slip stitch |
| inc | 2 sc in same stitch (increase) |
| dec | Sc 2 sts together (decrease) |
| rnd(s) | Round(s) |
See our abbreviations glossary for the full list including UK terms.
Gauge
Gauge is not critical for this decorative project — the goal is tight, even stitches that hide the stuffing rather than an exact measurement.
Notes
- Written in US terms, worked in a continuous spiral, using the same increase and decrease rhythm as our mini amigurumi ball pattern.
- The body and head are worked in the round without joining, so keep a stitch marker in the first stitch of each round.
- This turkey is a table decoration, not a toy for children under three — see the FAQ for how to make it as safe as possible.
Pattern
Using brown yarn, make a magic ring, 6 sc into ring, place marker. (6 sts)
Inc in every st around. (12 sts)
[sc 1, inc] around. (18 sts)
[sc 2, inc] around. (24 sts)
[sc 3, inc] around. (30 sts)
[sc 4, inc] around. (36 sts)
Sc in every st around, no increases. (36 sts each round)
[sc 4, dec] around. (30 sts)
[sc 3, dec] around. (24 sts)
[sc 2, dec] around. (18 sts)
Begin stuffing firmly.
[sc 1, dec] around. (12 sts)
Add final stuffing to fill evenly.
Dec around. (6 sts)
Fasten off, thread the tail through the front loops of the last round, and pull tight to close.
Using brown yarn, work as for the body but smaller: magic ring, 6 sc (6 sts); inc around (12 sts); [sc 1, inc] around (18 sts); sc in every st around for 4 rounds (18 sts each); [sc 1, dec] around (12 sts); dec around (6 sts). Stuff lightly, close, and leave a long tail to sew to the body.
Using orange yarn, ch 3, sc in the 2nd ch from hook, sl st in the last ch. Fasten off, leaving a tail for sewing.
Using red yarn, ch 5, sl st in the 2nd ch from hook and in each remaining ch. Fasten off, leaving a tail for sewing. This makes a small red dangle that hangs below the beak.
Using brown yarn, ch 2, work 4 sc in the 2nd ch from hook, turn. (4 sts)
Ch 1, inc in each st, turn. (8 sts)
Ch 1, [sc 1, inc] across, turn. (12 sts)
Ch 1, [sc 2, inc] across, turn. (16 sts)
Ch 1, [sc 3, inc] across, turn. (20 sts)
Ch 1, sc in each st across. (20 sts)
Ch 1, then *ch 5, sl st in next st; repeat from * across the row to make 20 feather loops. Change colour every 4 loops through rust, gold, mustard, deep red, and rust again. Fasten off, leaving a long tail to sew the fan to the body.
Sew the head to the top front of the body. Sew the beak to the centre of the face and the wattle just below it so it dangles. Sew the straight bottom edge of the tail fan to the upper back of the body so the feather loops fan upward and outward. Embroider two small eyes with black yarn if you like. Weave in all ends.
A beginner amigurumi tutorial for working in the round, useful for seeing the increase, decrease, and stuffing technique used in this turkey.
Autumn colour choice
A smooth worsted-weight brown reads as a turkey far more clearly than a dark charcoal or a golden tan, so I keep the body simple and let the tail do the talking. For the feathers I reach for rust, mustard, gold, and deep red, and I do not overthink the order, because a slightly scrappy mix of loops looks more like a real spread of feathers than a perfectly repeating pattern does. If you only have a few autumn scraps, three colours is plenty; alternate them every few loops and the fan still looks full.
The beak and wattle are tiny, so this is a lovely way to use up the last inches of orange and red left over from other projects. I once finished a whole turkey using a brown I had rescued from a frogged scarf and feather scraps from a dozen different autumn makes, and the mismatched fan ended up being the detail everyone asked about. If you are choosing new yarn, anything medium-weight and smooth will work; check our best yarn for amigurumi guide if you want my full recommendations on fibre and twist.
The tail fan technique
The fan is a flat half-circle worked back and forth in rows, which is why even a first-timer can manage it. You start from a narrow point and increase one stitch into every stitch across a few short rows, so the piece widens into a half-disc, then you work one plain row along the top and finish by edging that top with a row of loops. Each loop is just five chains anchored with a slip stitch, and together they make the feathered edge. If you have never worked a loop edge before, this is a forgiving place to learn, because a slightly uneven loop simply looks like a ruffled feather.
When you sew the fan on, the straight bottom edge sits against the upper back of the body and the feathered curve arcs upward like a fanned tail. I tell my students to pin it in place first and step back, because the angle makes the difference between a proud turkey and one that looks like it is carrying a brown lollipop. Sew the straight edge with firm stitches, then run a second pass slightly higher so the fan cannot tip backwards. The result is a tail that stands on its own without any wire or stiffening, which is exactly what you want for something that sits on a table all day.
Making it bigger or smaller
The body uses the same symmetrical shaping as our amigurumi ball pattern, so it scales cleanly. For a larger turkey, add one more increase round to the body (taking you to 42 stitches instead of 36), work one extra even round, then mirror the matching extra decrease round at the bottom. For a smaller one, stop increasing at 30 stitches and adjust the even and decrease rounds to match. Scale the head the same way — add or remove one increase round and one even round — so the proportions stay right.
The fan is easier still: add or remove one increase row, and the number of feather loops grows or shrinks by a matching amount. If you make the body much bigger you will want a bigger fan too, or the tail looks like an afterthought. A slightly larger fan on a small turkey is fine, though, and honestly a little charming, like a bird puffing itself up for the table.
Table decor & gifting
This is the pattern I recommend when someone wants to hand-make their Thanksgiving table instead of buying a plastic centrepiece. A single turkey at the middle of the table is lovely, but a line of them marching down a runner as place-card holders is the thing people remember. Because the body is stuffed and soft, they sit upright without wobbling, and a small card slotted between the fan and the body turns each one into a name marker. I have also tucked them into host gifts, and they travel far better than a real pumpkin pie.
If you are making several as gifts, match the feather colours to the recipient's own kitchen rather than your own, and it instantly feels personal. One of my students made a set in navy and cream for a coastal cousin and they looked nothing like autumn and everything like her kitchen, which is the point. Whatever colours you pick, keep them firmly sewn and stitch the beak and wattle on twice, because these pieces are handled and admired more than any other decoration on the table.
Fairfield Poly-Fil Premium Fiber Fill, 32oz
Enough for a whole flock of seasonal projects like this one, staying fluffy without clumping over time.
View on Amazon →Common mistakes & fixes
Frequently asked questions
Can a complete beginner really crochet this turkey?
Yes. The body and head are plain single crochet worked in a spiral, and the tail fan is simple rows of single crochet. The only slightly advanced skill is the magic ring, and you can substitute a chain-2 start if you prefer.
How do I make the tail fan stand up straight?
Keep the fan rows worked at a firm, even tension, then sew the straight bottom edge of the fan to the upper back of the body with several passes so it stands away from the body rather than flopping. A slightly tighter hook size on the fan also helps it hold its shape.
What colours should I use for the tail feathers?
Classic autumn colours work best: rust, mustard, gold, deep red, and burnt orange. Alternate them every few feather loops so the fan looks like a real turkey's spread tail rather than one solid block of colour.
Can I make this crochet turkey bigger or smaller?
Yes. Add or remove one increase round from the body and mirror the matching decrease rounds, and work one more or one fewer even round for the height. Scale the head and fan by the same amount and you will need a little more or less yarn and stuffing.
Is this crochet turkey safe for a baby or toddler?
This turkey is designed as a table decoration, not a toy for children under three. Use embroidered eyes instead of safety eyes and check that the beak, wattle, and fan are sewn on very firmly before displaying it anywhere a small child could reach.
How do I stop the stuffing from showing through?
Work at a tight, even tension with a hook one size smaller than the yarn label suggests so the stitches close up, and fill the body firmly but smoothly a little at a time rather than in one big lump.
How long does this crochet turkey take to make?
Most beginners finish in two to three hours. The body is the fastest part, and the tail fan and sewing the pieces together take the longest.
CrochetGuides is a participant in the Amazon Services LLC Associates Program. As an Amazon Associate we earn from qualifying purchases, at no extra cost to you.